Working With Styles in Word (and similar programs)
One thing authors and editors should be conversant in is working with Styles. For anyone working with a publisher (book, newspaper, ezine, etc.) or submitting stories for anthologies, it's essential.
If you know your way around Word's Styles pane and how to add to or modify its many options, you can save major time formatting a manuscript. You'll also set yourself up for a cleaner import into Vellum or Atticus if you're using that formatting software for your ebook and print book files.
Not to mention that having everything standardized and simple to navigate makes your beta readers' and editor's lives easier when they're trying to help you polish your story. Pro tip: Formatting your manuscript with Styles before sending it to your editor also saves them time, which can translate to you saving some money.
Let's get to the nitty-gritty of working with this helpful tool. First up, modifying Word's Normal style.
Note: The styles below do not account for setting alternating margins in a manuscript.
Modifying the preset Normal style
The Normal style is the backbone of all Word documents. It's also the basis for all of Word's styles. Whether you realize it or not, the program opens a new file with preset parameters every time. This is the style all your body copy (AKA your story or content) is set to.
The good news is you can modify it to suit your needs rather than creating a new Normal style. There are several steps involved, but it's not as painful as it sounds.
Step 1: Right-click on the Normal style in the Styles pane in your top menu bar.
Step 2: Select the Modify option.
Step 3: The Modify Style dialog box opens.
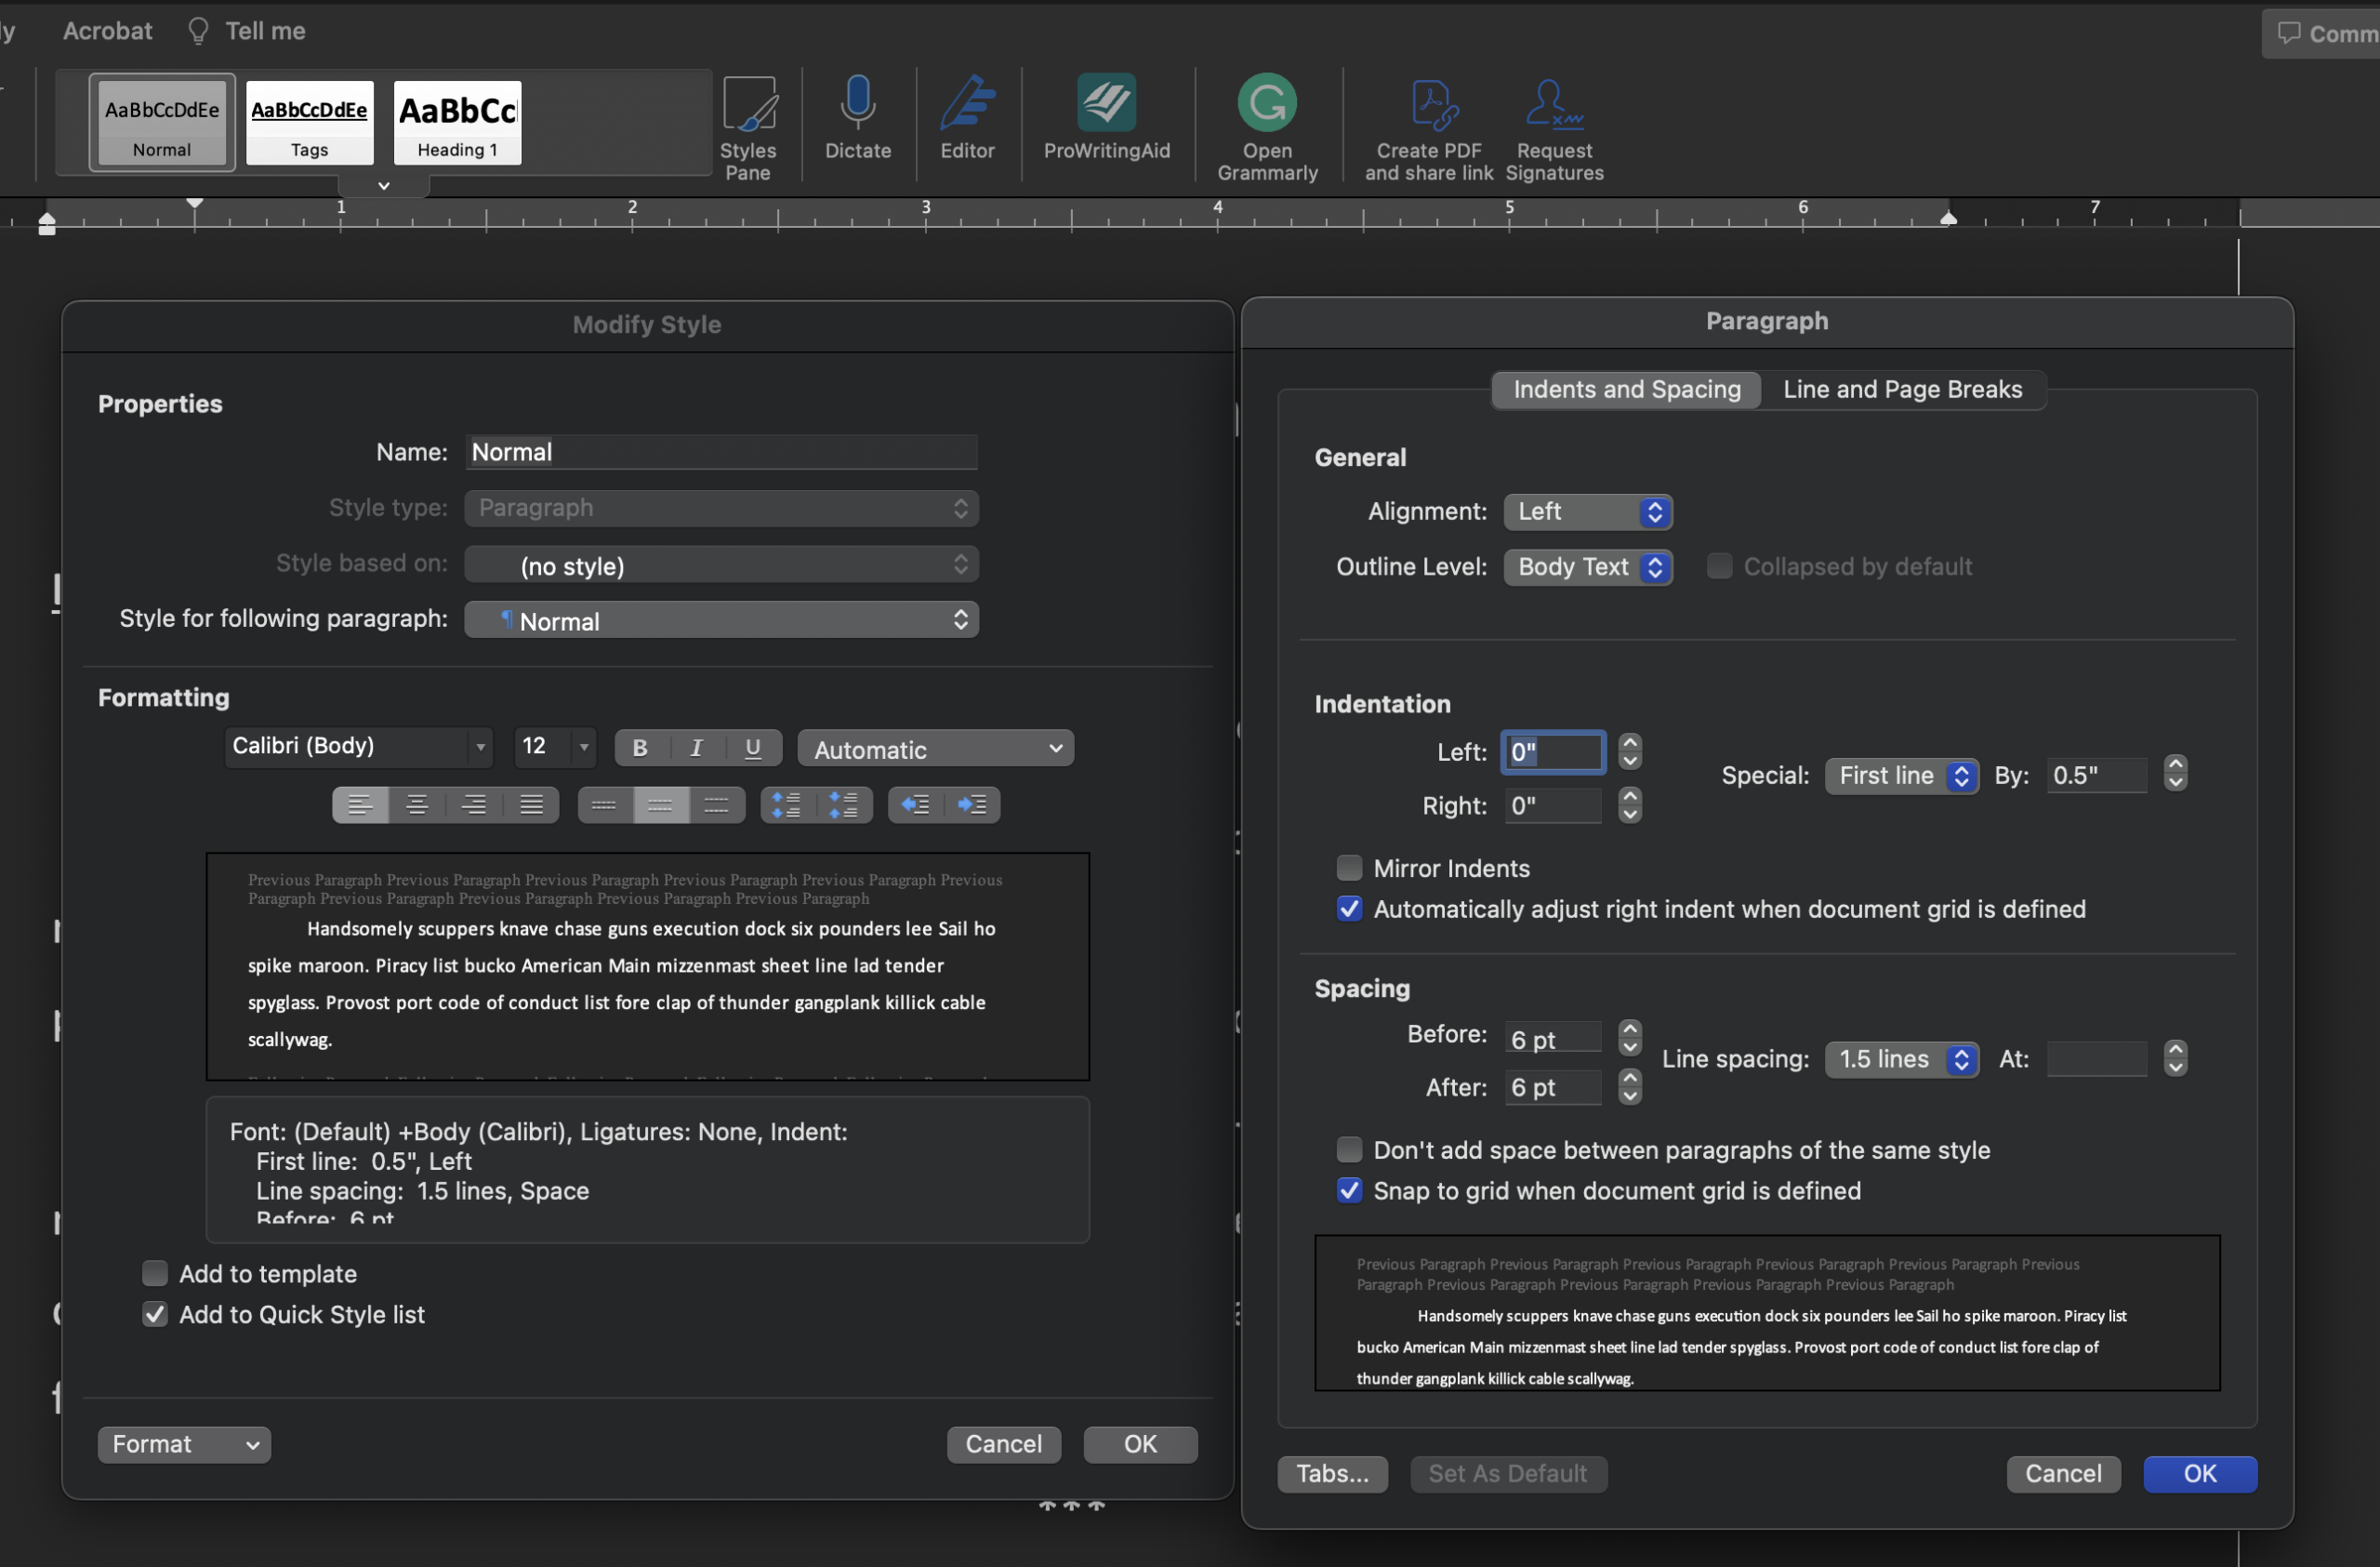
Step 4: Ensure your Properties section matches the Normal/Paragraph/(no style)/Normal options shown on the left side of the screenshot below.
Step 5: Set your font and styling. I work with Calibri (body), 12 pt., Automatic color (due to Night Mode), Left justified, 1.5 line spacing.
Step 6: Go to the bottom left corner of the Modify Style dialog box and click the down arrow on the Format button. Select the Paragraph option. This opens the Paragraph dialog box.
Step 7: On the Paragraph dialog box, confirm the General settings are Left alignment and Body Text for the outline level.
Step 8: Leave the left and right indentation set to 0" unless your required style specifies otherwise. Set the Special setting to First line By 0.5".
Step 9: In the Spacing section, set your Before and After to 6 pt (or whatever your publisher's settings specify) and double-check that the line spacing remains at 1.5 lines.
Step 10: Click OK on the Paragraph dialog box. It will close.
Step 11: Click OK on the Modify Styles dialog box. It will close.
Congratulations! You successfully modified the Normal style and are ready to move to setting up your Heading 1 style.
Image above: Modifying the Normal style in MS Word
Modifying the preset Heading 1 style
So far, we've focused on modifying existing styles. There's a reason for that. It's far easier to do so and have it work correctly the first time than to deal with styles that override one another.
The Heading 1 or H1 style is another heavy lifter in your manuscript. This is what you'll use for your chapter headers. H1 styles carry across into creating your Table of Contents, and are what makes it easy for readers (and editors!) to navigate back and forth without endless scrolling.
Keep in mind that the Heading 1 style is based on the Normal style, so the basics of what you changed in the steps above are already in place. Let's walk through how to change your chapter header settings.
Step 1: Right-click on the Heading 1 style in Word's Style pane.
Step 2: Select the Modify option.
Step 3: The Modify Style dialog box opens.
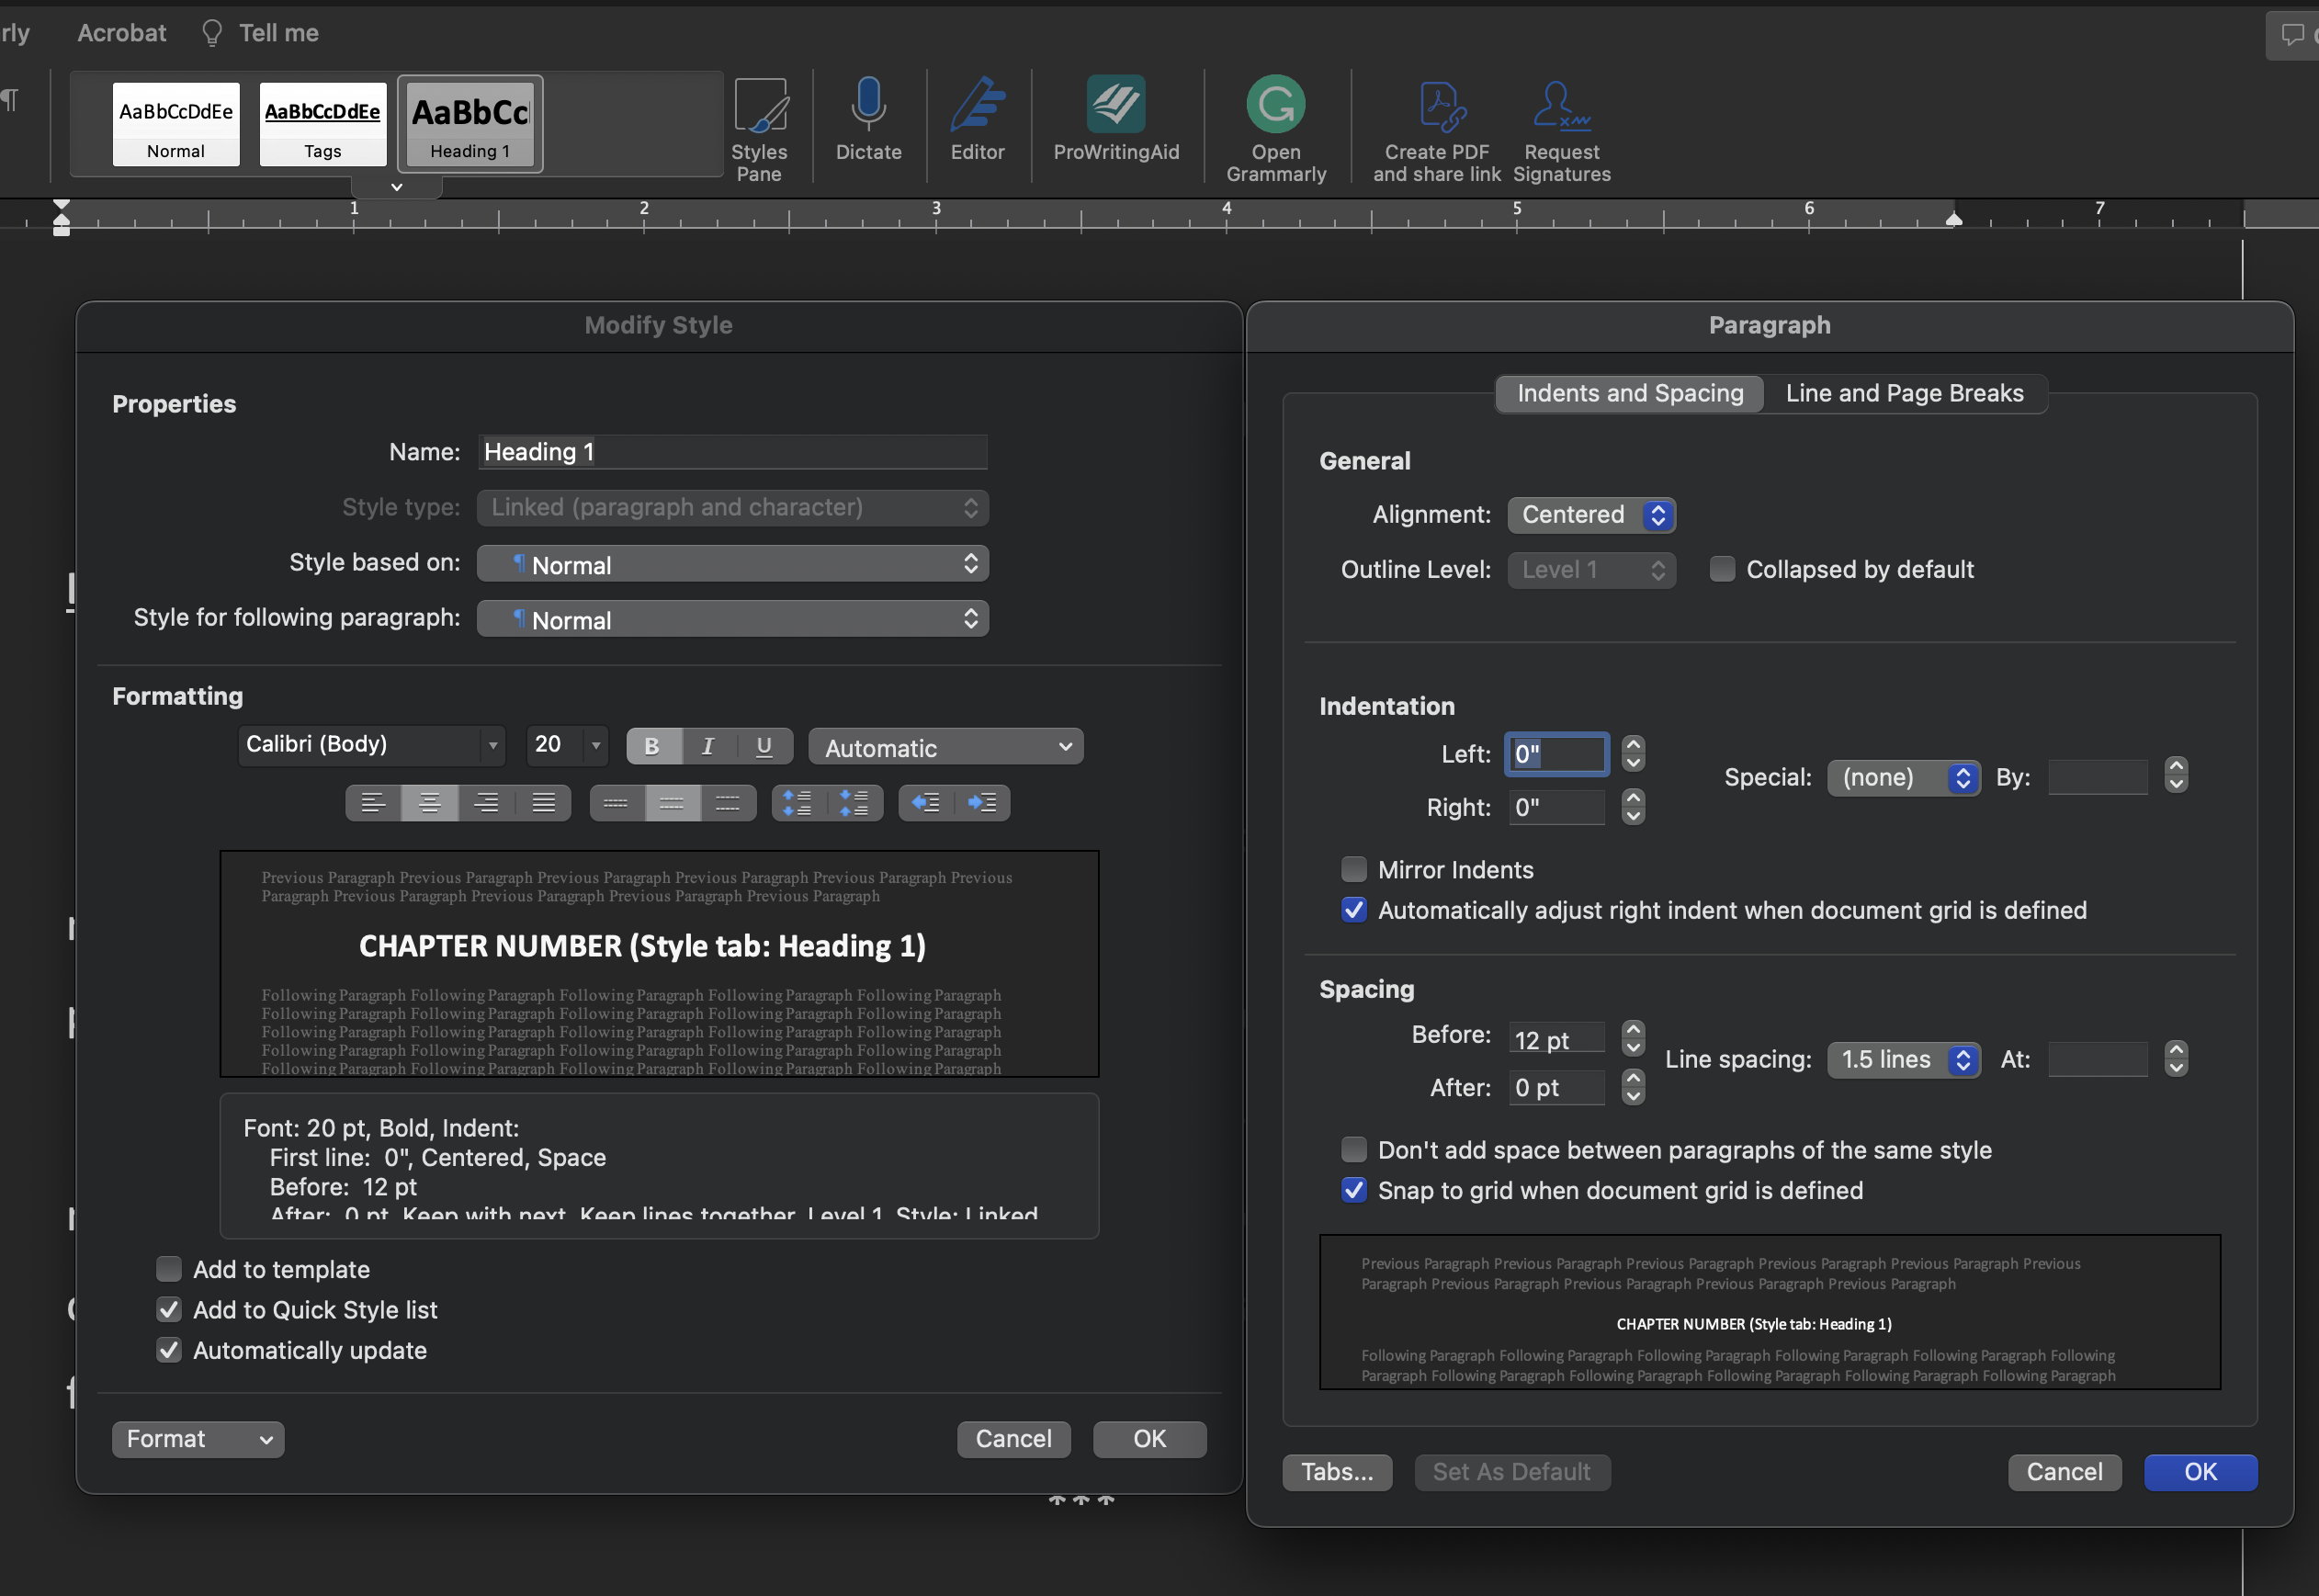
Step 4: Ensure your Properties section matches the Heading 1/Linked (paragraph and character)/Normal/Normal shown in the screenshot below.
Step 5: Set your font and styling. I work with Calibri (body), 20 pt., Bold, Automatic color (due to Night Mode), Centered, 1.5 line spacing.
Step 6: Go to the bottom left corner of the Modify Style dialog box and click the down arrow on the Format button. Select the Paragraph option. This opens the Paragraph dialog box.
Step 7: On the Paragraph dialog box, confirm the General settings are Center alignment and Level 1 for the outline level.
Step 8: Leave the left and right indentation set to 0" unless your required style specifies otherwise. Set the Special setting to (none).
Step 9: In the Spacing section, set your Before to 12 pt and After to 0 pt (or whatever your publisher's settings specify) and double-check that the line spacing remains at 1.5 lines.
Step 10: Click OK on the Paragraph dialog box. It will close.
Step 11: Click OK on the Modify Styles dialog box. It will close.
Congratulations! You successfully modified the Heading 1 style and are ready to create a custom style.
Image above: Modifying the Heading 1 style in MS Word
Creating a Custom Style
For this section, we'll create a style called Tags. These are also known as Geolocator tags or Locator tags, depending on your editor and/or publisher. This is the style that creates the date/time/location information line(s) you see in many science fiction and fantasy books.
Here's how you'll do it.
Step 1: Go to your Styles pane and click on the Styles Pane button (the one with the edit brush icon). On my screenshots, it's on the right side of my Styles pane.
Step 2: Click the New Style... button.
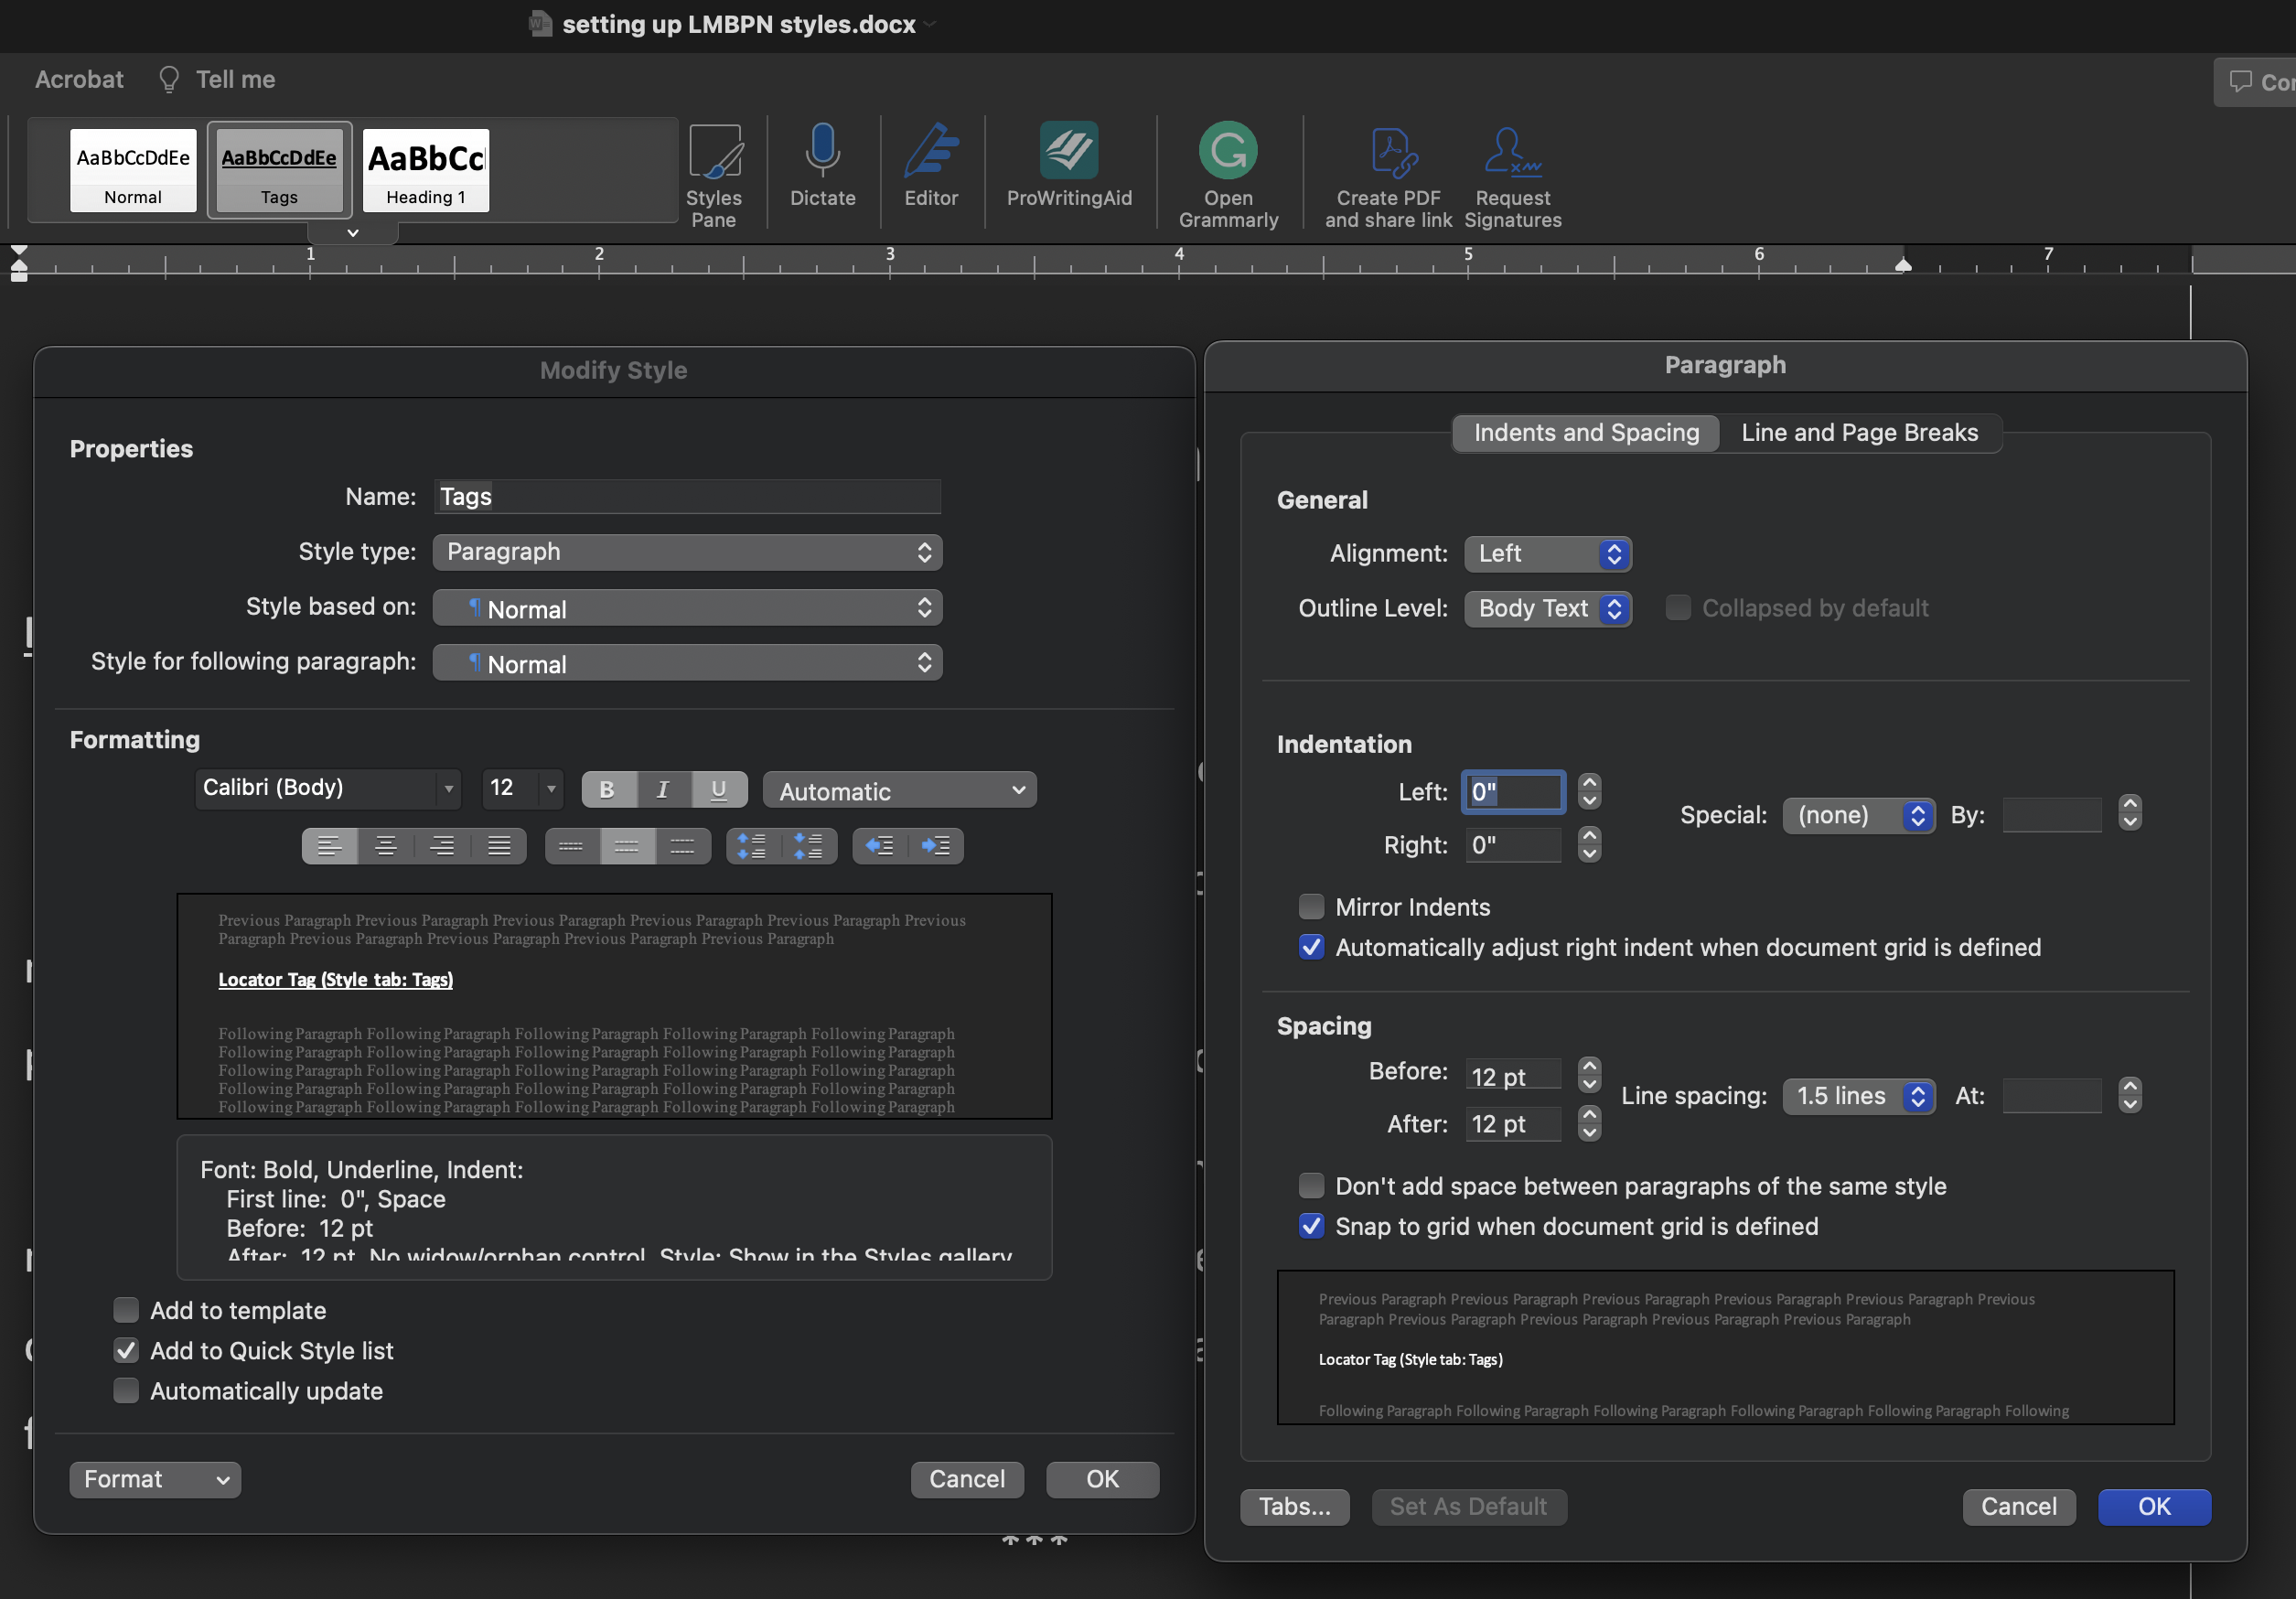
Step 3: In the Properties section, name your style. For this purpose, call it Tags. Style type is Paragraph, Style based on Normal, and change Style for following paragraph to Normal. That last part is critical if you're importing your manuscript into Vellum. Otherwise, Vellum won't recognize your tags...and let's just say you now have a formatting migraine.
Step 4: In the Formatting section, set your font and styling. I work with Calibri (body) 12 pt. Bold, Underlined, Automatic font color, Left justified, 1.5 line spacing. Be sure to check the "Add to Quick Style list" option. This adds your new style to the Styles pane in your document for easy use.
Step 5: Go to the bottom left corner of the Modify Style dialog box and click the down arrow on the Format button. Select the Paragraph option. This opens the Paragraph dialog box.
Step 6: On the Paragraph dialog box, confirm the General settings are Left alignment and Body Text for the outline level.
Step 7: Leave the left and right indentation set to 0" unless your required style specifies otherwise. Set the Special setting to (none).
Step 8: In the Spacing section, set your Before and After to 12 pt (or whatever your publisher's settings specify) and double-check that the line spacing remains at 1.5 lines.
Step 9: Click OK on the Paragraph dialog box. It will close.
Step 10: Click OK on the Modify Styles dialog box. It will close.
Congratulations! You successfully created the Tags style.
Image above: Creating the Tags style in MS Word.
There you have it! Armed with this knowledge, you're ready to conquer the settings any publisher throws at you. Your editor(s) will thank you. So will your beta readers. Best of all, you'll thank yourself for eliminating the time-consuming tedium of going back through everything and formatting manually...while trying to remember how you set up various elements.
Contains information related to marketing campaigns of the user. These are shared with Google AdWords / Google Ads when the Google Ads and Google Analytics accounts are linked together.
90 days
__utma
ID used to identify users and sessions
2 years after last activity
__utmt
Used to monitor number of Google Analytics server requests
10 minutes
__utmb
Used to distinguish new sessions and visits. This cookie is set when the GA.js javascript library is loaded and there is no existing __utmb cookie. The cookie is updated every time data is sent to the Google Analytics server.
30 minutes after last activity
__utmc
Used only with old Urchin versions of Google Analytics and not with GA.js. Was used to distinguish between new sessions and visits at the end of a session.
End of session (browser)
__utmz
Contains information about the traffic source or campaign that directed user to the website. The cookie is set when the GA.js javascript is loaded and updated when data is sent to the Google Anaytics server
6 months after last activity
__utmv
Contains custom information set by the web developer via the _setCustomVar method in Google Analytics. This cookie is updated every time new data is sent to the Google Analytics server.
2 years after last activity
__utmx
Used to determine whether a user is included in an A / B or Multivariate test.
18 months
_ga
ID used to identify users
2 years
_gali
Used by Google Analytics to determine which links on a page are being clicked
30 seconds
_ga_
ID used to identify users
2 years
_gid
ID used to identify users for 24 hours after last activity
24 hours
_gat
Used to monitor number of Google Analytics server requests when using Google Tag Manager
1 minute
You can find more information in our Cookie Policy and .